
How to Properly Prime Your Atomizer Coil
As you use your vaporizer, you will slowly begin to notice decreased vapor production and less intense flavor. After a week or two, you will start experiencing a burnt taste, indicating that it is time to change your atomizer coil. While many simply fill the tank, screw on the new coil, and begin vaping, it is highly recommended that you first prime your new coil prior to using it. Doing so will substantially add to the flavor of the e-juice, as well as help optimize your vaping experience.
In short, priming an atomizer coil simply means to pre-saturate the wicking material with e-liquid prior to first using it. This moisture will prevent the wicking material from overheating and burning. It also allows the wick to more fluidly and uniformly absorb the e-liquid from the tank and deliver it to the coil.
Instructions on How to Prime an Atomizer Coil:
Priming an atomizer coil is very easy, simply follow these steps below:
Step One: Attach the New Atomizer Coil
Once the old coil has been disposed of, screw on the new one in its place. This will give you something larger to hold onto while you’re adding e-juice to the coil. It also helps prevent e-liquid from getting on your fingers, as screwing it on after the wick has been saturated could cause it to get on your fingers as well.
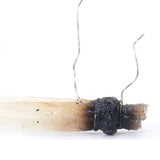
Step Two: Saturate the Wicking Material
 The next step in priming your clearomizer coil is to locate the juice holes on the body of the atomizer head, where the wick makes contact with the e-liquid. Some coils are designed with the cotton sticking out of the holes, while others have the wick behind them. In either case, the wicking material will be exposed and easily visible. Add one single drop of e-juice in each of the holes in order to uniformly saturate the wick.
Next, saturate the cotton with e-juice. Depending on the specific atomizer coil you are using, the amount of e-juice necessary to adequately saturate the wicks will vary. Smaller atomizer coils, such as the Aspire Nautilus, will require a drop or two of e-liquid, whereas the substantially larger heads that operate with the tanks, such as the SMOK TFV8 Cloud Beast, will require much more to accomplish this. You will know when you have added enough e-juice when the cotton stops immediately absorbing it. However, make sure not to over-saturate, as this may cause flooding and allow for liquid to get into your mouth. Remember, your goal isn’t to drench the coil, it is solely to saturate the cotton.
Step 3: Take Some Dry Hits
Once you have filled and reassembled the tank, attach it to your battery. The next step in priming your coil is to take 4 – 5 dry hits. A dry hit simply means to take a drag without activating the fire button of your battery. Simply tighten the airflow valve (if your tank has one), cover the air intake holes with your hand, and take four or five normal drags. By doing this, you will syphon e-juice from the tank and into the cotton. However, be sure not to take too deep or strong of hits, nor take more than five of them, as it could cause the coil to flood.
Step 4: Break-In The Coil:
Although the most important factor in priming coil is to saturate the wicking material, it is also significant to properly break-in the new wire. Since the wire expands when heated and contracts when it cools, it is good practice to gradually break the wire in as well. To do so, start using the new coil at a lower wattage than you normally do. After a few hits, you can gradually increase the wattage until you reach your normal power setting. It also helps if you take shorter hits for the first 10 drags, so that the wire is not excessively heated at first. This steady increase in wattage and puff duration will ensure that the coil is properly primed along with the cotton.
Benefits of Priming Your Atomizer Coil:
Eliminating Burnt Hits:
The primary benefit enjoyed when a coil is properly primed is the avoidance of dry or burnt hits. When an atomizer coil is unused, the wicking material is completely dry. Since it is making contact with the coil, once heated the cotton will burn resulting in an unpleasant charred taste. By pre-saturating the coil, you will prevent this from happening since the liquid will be vaporized rather than the cotton being burned.
Heightens Flavor Intensity:
The key benefit in priming your coil is that it helps substantially add intensity and robustness to the flavor of your e-juice. By pre-saturating the cotton as well as the coil itself, you will experience a burst of rich flavor from the very first hit. Moreover, since you have avoided burning the cotton, the flavor will not be compromised by the charred taste, as would otherwise be experienced.
Adds to the Longevity of the Coil:
Primed atomizer coils last markedly longer than coils that haven’t been primed. This is principally due to the fact that the materials within the coil have been appropriately broken-in. A burnt or charred wick will itself drastically reduce the life of an atomizer coil.
Correctly priming your atomizer coil is extremely easy, and can be done very rapidly. The benefits that coil priming offers is certainly worth the minute or two it takes to do accomplish. You will have a much more enjoyable vaping experience, while simultaneously increasing the life of the coil.


